
The control starts up in Incremental jog mode. In order to jog the axis in continuous movement, you need to press the INCR/CONT key to switch from incremental to continuous jog mode.
The Machine Home position is fully Z+ (column to the back).
|
The control starts up in Incremental jog mode. In order to jog the axis in continuous movement, you need to press the INCR/CONT key to switch from incremental to continuous jog mode. |
You can start and stop spindle rotation manually with jog panel keys, or automatically with program codes.
The spindle must be in Auto mode in order to use programmed M codes. The spindle must be in Manual mode in order to use the jog panel keys.
 |
Switch between Auto and Manual spindle control modes. |
In manual mode, you can control operation with these keys:
 |
Start spindle |
 |
Stop spindle |
In Auto mode, you can control operation and direction with these codes:
| M3 | Start spindle forward |
| M5 | Stop spindle |
You can start and stop the coolant pump manually with jog panel keys, or automatically with program codes.
Coolant control must be in Auto mode in order to use programmed M codes. Coolant control must be in Manual mode in order to use the jog panel keys.
 |
Switch between Auto and Manual coolant control modes. |
In manual mode, you can control operation with this key:
 |
Start or stop coolant |
In Auto mode, you can control coolant flow with these codes:
| M8 | Start coolant |
| M9 | Stop coolant |
The hydraulic system is used for the table shuttle (left-right) function.
With the hydraulic pump running, the table can be started and stopped, and its speed controlled, with the throttle valve.
The pump can be turned on and off manually or automatically, without any auto or manual control mode selection:
 |
Start or stop hydraulic pump |
| M13 | Start hydraulic pump |
| M14 | Stop hydraulic pump |
Before you can start the hydraulic pump:

The infeed value (the amount that the control will advance the wheel for each grinding pass) can be between 0.0001" and 0.0010", in 0.0001" increments.
The current infeed amount is displayed in the status window, in the upper right portion of the screen, as the "Spindle" number. This number will be between 1 and 10, representing the number of 0.0001" increments that the wheel will advance in each pass.
You can increase or decrease the infeed amount at any time, using the Aux4 and Aux7 keys on the jog panel:
 |
Increase infeed amount by 0.0001" |
 |
Decrease infeed amount by 0.0001" |
A typical grinding program will prompt you to enter the desired grind depth at the beginning of the cycle. The machine will grind to that depth below wherever the Z0 position was set, even if you jog the wheel farther away before beginning.
For example, if you touch the part and press Aux2 to set Z0; then move the wheel back to Z+0.0200"; then enter a grind depth of 0.0300", the machine will make grinding passes for a total of 0.0500", from Z+0.0200 to Z-0.0300.
The target depth to which the program will grind is shown on the second line of the DRO position display, next to the letter 'W'.
During a program cycle, you can pause infeed at any time by pressing the Feed Hold button on the jog panel. Table movement will continue, giving you any number of "dwell" passes. Press Cycle Start to resume normal infeed movements.
The standard grinding program, updated January 2024, looks like this example:
M224 #101 "Enter total depth to grind" | Prompt operator to enter desired depth. | |
#101 = ABS[#101] | If the entered number was negative, make it positive. | |
#103 = 5 | Set a variable for the number of spark-out passes. | |
#110 = #5043 | Save starting Z position in a variable, for return at end of cycle. | |
#111 = -#101 | Set target Z position, starting from Z0, in a variable. | |
G92 W#111 | Display target position on manual 'W' line of DRO | |
M3 | Turn on grinder spindle. | |
G4 P2.0 | Wait a couple seconds for it to get up to speed. | |
M13 | Turn on the hydraulic pump. | |
M8 | Start flood coolant | |
#112 = #5043 | Initialize a variable for the current Z position. | |
N10 | This is the top of the loop which repeats until Z is at the desired depth. | |
M33 | Wait until the table is at its left turnaround point. | |
#102 = #96008 * 0.0001 | Get the current depth increment from the PLC program (PLC variable W8). | |
#112 = #112 - #102 | Subtract that increment from the current Z position. | |
IF [#112 < #111] THEN #112 = #111 | Prevent Z from going beyond its final depth target. | |
G1 G90 F1 Z#112 | Move Z to the next depth. | |
IF [#112 > #111] THEN GOTO 10 | If not done yet, continue looping. | |
N20 | ||
M33 | Wait for table to complete the final depth pass. | |
N30 | This is the top of the loop which repeats for spark-out passes. | |
IF [#103 <= 0] THEN GOTO 40 | Jump to end if done. | |
M33 | Wait for the table to move back and forth. | |
#103 = #103 - 1 | Deduct one from the remaining number of spark-out passes. | |
GOTO 30 | Go back to the top of the loop, to see if we are done. | |
N40 | ||
M101/70021 | Wait for the table to be at its left turnaround. | |
M8 | Turn off flood coolant | |
M14 | Turn off the hydraulic pump to stop table motion. | |
M5 | Turn off the grinder spindle. | |
G0 G90 Z#110 | Return Z to its starting position. |
In normal operation, the Auxiliary keys on the jog panel have the following functions:
|
Hydraulic pump on/off |  |
Zero DRO position |  |
Solenoid valve #1 on/off |
|
Increase step-in amount |  |
No function |  |
Solenoid valve #2 on/off |
|
Decrease step-in amount |  |
No function |  |
Solenoid valve #3 on/off |
| (Aux10) | No function | (Aux11) | No function | (Aux12) | No function |
| (Aux13) | No function | (Aux14) | No Function |
The three solenoid valves have no specific functions as of 10/9/2023, but are supported in the control for possible future use.
Aux keys with no default function shown above are available for
custom PLC-controlled features, or for features assigned through
Machine Parameters 188-199. See Chapter 15 of the M-Series Operator's Manual.
M Function Summary
| M0 | Stop (wait for Cycle Start) |
| M1 | Optional Stop (wait for Cycle Start) |
| M2 | Program Restart (with wait for Cycle Start) |
| M3 | Spindle Start |
| M5 | Spindle Stop |
| M8 | Flood Coolant On |
| M9 | Coolant Off |
| M13 | Hydraulic pump on |
| M14 | Hydraulic pump off |
| M33 | Wait for table to reach left turnaround |
| M34 | Wait for table to reach right turnaround |
| M35 | Wait for table to reach either left or right turnaround |
| M70 | Prompt the PLC to read a new depth increment from Parameter 700 |
See Chapter 13 of the Centroid M-Series Operator's Manual for descriptions of standard M functions.
M functions M91 and above are used internally in custom macro programs, but
are generally not used directly in user machining programs.
Machine Parameters Summary
The following parameters on the Centroid Machine Parameters table are used for features specific to this machine.
| Parameter | Meaning | Value | Notes |
|---|---|---|---|
| P143 | DRO display | 11 | Show load meters on DRO, plus distance-to-go display |
| P146 | Feedrate threshold | 3 | Activate Feed Hold if Feedrate Override is turned down below 3% |
| P259 | Manual axis designation | 64 | Axis #7 (W) is for display only, and has no servo motor |
| P700 | Depth increment, for M70 | 1 - 10 | Distance, in 0.0001" increments, to advance Z at each step. This is a temporary value, read in by the PLC program in response to M70. |
| P720 | Star/delta startup time | 1000 | Time (ms) to run spindle motor on star (wye) contactor during startup |
| P721 | Star/delta changeover | 50 | Time (ms) between turning star contactor off and turning delta contactor on |
For all other Machine Parameter functions, see Chapter 15 of the Centroid M-Series Operator's Manual.
You can use the PLC Diagnostic display on the console to view the Centroid PLC input, output and memory locations that are referenced in the Fault, Error and Warning messages below.
At the control's main screen, press Alt-I to activate the PLC Diagnostic display. Press Alt-I again to dismiss it.
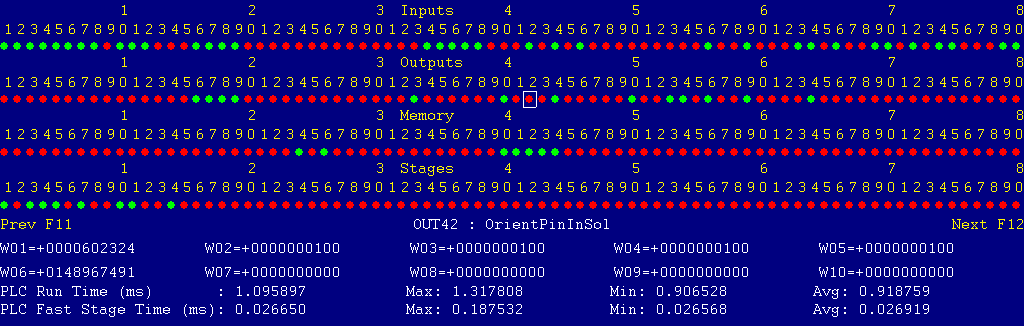
Each page of the Diagnostic display shows four rows of red and green dots: the first row shows PLC inputs 1 through 80; the second row PLC outputs 1 through 80; the third row PLC memory bits 1 through 80; and the fourth row PLC program stages 1 through 80.
You can use the arrow keys to move a highlight box over any of these locations. The name of the highlighted location will be displayed in the center of the screen below the red and green dots.
For example, in the illustration above the highlight box is on Output #42: The dot below the 2, to the right of the superscript 4, on the second line.
Below the four rows of bit status information are ten numeric ("word") variable values, labeled W1 through W10. Some of these variables also hold useful status information, described with the error and fault conditions to follow.
There are multiple pages of Diagnostic data. With the Alt-I diagnostic display showing, you can use the F12 and F11 keys to scroll right and left. For example, pressing F12 once will shift to the page showing inputs and outputs 81 through 160, and word variables W11 through W20.
The PLC system can "invert" inputs in its software, making a closed input appear open and an open input appear closed. This is useful when the PLC logic assumes one type of sensor (e.g. normally-closed) and the machine is built with another type (e.g. normally-open). If the PLC system is inverting an input, then that input will be shown on the PLC Diagnostic display with an overscore above it. The color of the dot will represent the inverted state, not the actual electrical state. In other words, a green dot with an overscore represents an electrically open input, which appears in the PLC logic to be a closed input.
The PLC system can also "force" inputs, outputs, and memory bits to appear on or off, regardless of the actual hardware state or controlling PLC logic. An input, output, or memory bit that is being forced is displayed with a underscore below it.
The PLC program can generate several system-specific fault, error and warning messages, in addition to the general control messages listed in the Centroid operator's manual.
You can use the PLC Diagnostic display, described above, to view the Centroid PLC input, output and memory locations mentioned with these fault and error conditions.
Messages with 9000-series message numbers are Faults. After resolving the problem, you must press and release the Emergency Stop button to clear a Fault.
Messages with 8000-series message numbers are Errors. Errors will cancel the program cycle and stop the spindle and coolant, but they do not then need to be explicitly reset.
Messages with 5000-series, 4000-series and 2000-series message numbers are Warnings, Prompts, and Informational Messages. They do not cancel the cycle or require any action to reset.
The control detected an internal error in processing the PLC logic program.
Report this error to your dealer, along with the values from W14 and W15. Also report what function the machine was performing when the fault occurred.
You must shut down and cycle the power to clear this fault.
References:
PLC W14: Copy of internal SV_PLC_FAULT_STATUS, indicating the type of problem
PLC W15: Copy of internal SV_PLC_FAULT_ADDRESS, indicating the location of the problem
The grinder spindle motor tripped its overload relay (OL1)

Investigate possible causes for excessive load on the grinder spindle.
Shut down, power off, open the control cabinet, and press the blue reset button on OL1 (the left-most motor starter overload relay, in the right portion of the control cabinet).
Close the cabinet and power back up.
References:
PLC INP14: OL1 trip contact.  Green = closed = tripped.  Red = open = okay
PLC OUT7: M1 motor starter.  Green = on.  Red = off.
Schematic: Lines 3, 56, 66
The control unit detected loss of communication from the operator panel in the Console.
Check for damage or disturbance to the cable between the console and the Oak control unit in the control cabinet.
Press and release Emergency Stop to clear the fault.
References:
Schematic: Lines 34, 45
The operator panel reported back to the control unit a loss of communication from the control unit. This indicates the return signal from the pendant is functioning normally, but the outgoing signal may have problems.
Check for damage or disturbance to the cable between the console and the Oak control unit in the control cabinet.
Press and release Emergency Stop to clear the fault.
References:
Schematic: Lines 34, 45
You exited the CNCM control software without first pressing Emergency Stop.
Always press Emergency Stop prior to exiting the control software.
Press and release Emergency Stop to clear the fault.
The hydraulic pump motor tripped its overload relay (OL3)
Investigate possible causes for excessive load on the hydraulic pump motor.
Shut down, power off, open the control cabinet, and press the blue reset button on OL3 (the middle motor starter overload relay, in the right portion of the control cabinet).
Close the cabinet and power back up.
References:
PLC INP15: OL3 trip contact.  Green = closed = tripped.  Red = open = okay
PLC OUT2: M3 motor starter.  Green = on.  Red = off.
Schematic: Lines 6, 57, 61
The flood coolant pump motor tripped its overload relay (OL4)
Investigate possible causes for excessive load on the coolant pump.
Shut down, power off, open the control cabinet, and press the blue reset button on OL4 (the right-most motor starter overload relay, in the right portion of the control cabinet).
Close the cabinet and power back up.
References:
PLC INP16: OL4 trip contact.  Green = closed = tripped.  Red = open = okay
PLC OUT3: M4 motor starter.  Green = on.  Red = off.
Schematic: Lines 8, 57, 62
The supply-side circuit breaker for the main spindle (CB2) is tripped or switched off.
Investigate possible causes for a short circuit or ground fault in the spindle motor power circuit.
Shut down, power off, open the control cabinet, and reset the circuit breaker. CB2 is the left-most breaker in the row above the motor starters, in the right portion of the control cabinet.
Close the cabinet and power back up.
References:
PLC INP13: CB2 status.  Green = closed = okay.  Red = open = tripped or switched off
Schematic: Lines 3, 56
The safety cover was opened while an automatic program cycle was running.
Close the safety cover, then restart your operation.
References:
PLC INP10: Cover switch PRS6.  Green = closed = cover closed.  Red = open = cover open
Schematic: Line 54
You tried to start up the hydraulic pump, but the safety cover was not closed; or the safety cover was opened while the hydraulic pump was running.
Close the safety cover, then restart your operation.
References:
PLC INP10: Cover switch PRS6.  Green = closed = cover closed.  Red = open = cover open
Schematic: Line 54
You tried to start up the hydraulic pump, but air pressure was turned off or disconnected; or air pressure was lost while the hydraulic pump was running.
A minimum of 60PSI is required to float the outboard support pucks on the part fixture.
Restore air pressure, then restart your operation.
References:
PLC INP12: Pressure switch PS1.  Green = closed = pressure up.  Red = open = low or no pressure
Schematic: Line 55
The PLC program requested display of a message on the screen, but the provided message code was not valid.
This indicates an error in the PLC program. Report the message to your dealer, along with the value in PLC variable W16.
References:
PLC W16: stores the invalid message code
The program attemped to run an M3 spindle-start code, but the control is still in Manual Spindle mode.
Press the SPIN AUTO/MAN key in the top row of the operator panel to select Auto mode (LED on); then press CYCLE START to resume program operation.
The program attemped to run an M8 flood-coolant code, but the control is still in Manual Coolant mode.
Press the Coolant AUTO/MAN key on the left side of the operator panel to select Auto mode (LED on); then press CYCLE START to resume program operation.
Optionally, if you choose to run the job without coolant, you can press CYCLE START to resume operation without switching back to Auto coolant control.
A previous PLC fault condition has been resolved, and cleared with Emergency Stop.
You inadvertently pressed a keyboard combination that is used for keyboard jogging controls, but keyboard jogging features have been disabled on this machine.
A previous fault condition has been cleared with Emergency Stop.
28-Mar-2025 MBL
![]()